

| Taylor Dean
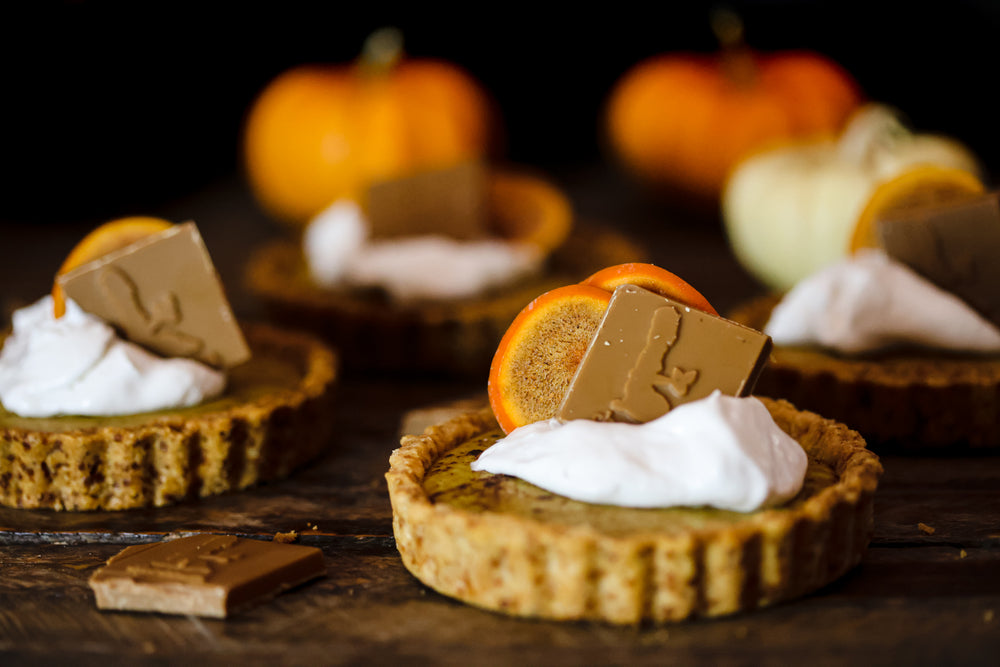
Pine Pollen Lemon Chocolate Pumpkin Tart
Time to make: 1 hour
Makes 6 tarts or one large 9 by 9 inch tart
Servings 8
Happy October!
To celebrate the beginning of October, pumpkins, sweaters, cozy spices and all the yummy things we love about fall we bring you a seasonal recipe with our Chocolita Pine Pollen Lemon Chocolate.
Pumpkin and Pine Lemon Chocolate -this is a match made in heaven. At least you'll think so when you try this scrumptious dessert. Our signature Pine Pollen Lemon Chocolate when combined with pumpkin puree, becomes a rich, yet light and creamy ganache filling. This ganache has a wonderful complex lemony pumpkin-ey/chocolatey flavor. Paired with a rich nutty almond flour tart crust it's a deliciously savory and sweet dessert. Perfect for fall, but really anytime of year.
Let's get started!
What you will need
- A 9-inch tart pan or 6 mini tart pans preferably a ones with a removable bottom
- rolling pin

Ingredients for the tart crust
- 2 1/2 cups of all purpose flour
- 1/2 cup of almond flour or whole oats
- 1 and 1/2 cup of cubed and chilled vegan butter (I am using earth balance brand here)
- 2 tablespoons of sugar
- 2 tablespoons of chilled plant milk (if needed)
- 1 teaspoon of vanilla extract
- pinch of salt (really good with smoked sea salt)
Method for Crust or Tart Shell
1. Crust: Whisk together the flour, sugar, almond flour and salt in a large mixing bowl
2. Using a fork or your hands start cutting the “cold” butter into the flour. If you have ever made a pie dough this is somewhat similar, you want to incorporate the butter into the flour until you have little pea tendril sized clumps or balls. You want the mixture to become crumbly and resembles coarse meal. Work fast while doing this, you don’t want to melt the butter into the flour but simply create little butter flour balls in the dough.

3. When you see little strand like crumbles in the dough equally throughout or as best as possible . Start adding 1 tablespoon of either cold ice water at a time or cold plant milk, vanilla and begin to work dough until it comes together into a ball. It should come together easily without being sticky. Do not overwork the dough.
4. Wrap the dough in plastic wrap and let rest in the refrigerator for up to15 mins. If you don’t want to use the dough right away, you can refrigerate it for up to 2-3 days, or freeze it for up to a month and then thaw overnight in the fridge.

5. Prepare your 9-inch tart pan tart pan or mini tart pans by giving it a little optional grease if it’s not non stick.
6. Option to choose- to roll out your dough into a 11inch round circle and place in tart pan you can do this by flouring a rolling pan and rolling the dough loosely around it, then unrolling it into the pan. Brush away any excess flour on the surface. Using a sharpe small paring knife trim the edges of the tart pan so it looks even all the way around.
..Or use your hands break up the dough and start smooshing into the tart pan to the sides and bottom evenly, using the back of a measuring cup you can smooth out the bottom and sides. Either method will work. It’s really important you reinforce the corners making sure there is enough dough.


7. Save excess dough in plastic wrap and keep in fridge.
8. Refrigerate or freeze you tart crust for up to 30 mins before baking.
Like a pie we will be blind baking this tart shell.

What is Blind Baking ?
Meaning we bake the shell first, and let cool before adding any filling. Typically you fill the tart pan with parchment paper and add either pie weight, rice, or beans..It’s simple..
9. Remove chilled tart from freezer or fridge and line with aluminum foil-press carefully around the bottom and sides you can use a measuring cup to reinforce that its pressed evenly. Be gentle. See picture below then add pie weights or dry beans to weigh down tarts.
10. Add tart to a preheated oven that is set to 375 and bake for up to 15 mins until foil has lifted from the top and sides are starting to slightly change color.
11. Remove the tart from oven let cool slightly and carefully remove the foil from top. You must be careful you don’t want the dough to rip off the foil so be gentle. Transfer back into over and let bake for another 4-5 mins.
12. Remove fully baked tart shell and let cool. Option you can also let the tart cool in the oven with the oven turned off.
13. If you see some cracking using your fingers take a little excess dough and using the littlest amount fill in and major cracks with the raw dough. Justing filling in the cracks slightly and gently.
Making the Pine Pollen Pumpkin Ganache


Ingredients
- 2 cups chopped Pine Pollen Lemon Chocolate or about 4 bars
- 1 cup of coconut milk or any kind of plant milk
- 2 tbs of Agave or maple syrup
- 1 Vanilla Pod or 1 teaspoon of vanilla extract
- pinch of cinnamon
- 4 heaping tablespoons of pumpkin purée
- 1/4 tsp of turmeric powder this is for color
Method
1. Heat the coconut milk on the stovetop in a small saucepan or the microwave until just about to boil then add pumpkin purée, vanilla, and agave .
2. Chop the Pine Pollen Lemon Chocolate into very small pieces and transfer it to a heat safe metal bowl.
3. Pour the hot coconut pumpkin milk mixture over the chocolate.
4. Mix chocolate well until dissolved and glossy. It should start to thicken.


5. Pour the chocolate mixture into your tarts and transfer to the fridge. Let set for
4 hours in the refrigerator or for 1 hour in the freezer.
Top with coconut whip cream for contrast and flair and serve with a slice of persimmon, fruit, or more chocolita chocolate